


The text tool is the fourth tool from the bottom of the tool palette. It is a capital letter A as shown in the image below.
Once you activate the text tool (by clicking on it or typing the letter t) the Tool Options palette changes to display settings to adjust the font, size, style, alignment and other options to change the appearance of text (to activate and deactivate the Tool Option palette use F4). The options can be set prior to or after clicking where you'd like the text to appear. After clicking on the image the Text Entry dialog box appears with a blank area where you can type the desired text. As the text is typed it will appear on the image with the formats chosen prior to clicking on the image. If you would like PSP to remember the text typed when the Text Entry dialog was last used there is a box that can be marked at the bottom of the dialog.
To change the formats after typing, the text inside the Text Entry dialog box must be selected. The shortcut to select all of the text is ctrl + a. The mouse can also be used to select only the text or characters intended to be changed by pressing and dragging across the text to be selected. Once the text is selected any of the formats on the Tool Options palette (shown below) can be modified and the formatting of the selected text will change. However, sometimes there is a delay of a few seconds before the change takes effect.

On the Tool Options Palette (shown above) one of the first options is Create as. In that setting there are three choices: vector, selection, and floating. These items are discussed in detail here. However, for this tutorial I will limit my explaination to say that I typically use the Vector option because it allows for adjustments to be made to the text and formats even after Apply has been chosen on the Text Entry dialog.
The next option, Font, is where the type face is selected. Many fonts will already be available, but you can purchase additional fonts and find free fonts on the internet as well. Try typing "free fonts" on my Search Page or in your favorite search engine to find links to sites with lots of free fonts.
The size option is measured in points. To give you an idea of size equivalents, there are 72 points in an inch. The size drop down list has various default choices, but if the size you need isn't listed you can type a custom size in the box. Click in the top of the size box on the current size and select the number if necessary, then type the size you'd like the font to be displayed as.
The Stroke width is the outline of the text measured in pixels. Although you can type in measurements using decimals I've experienced some glitches with this feature so I typically use whole numbers.
I find it helpful to check the Anti-alias box to help keep my text edges looking smooth. Using this option will increase the number of colors used in your image which can make it difficult to decrease the file size later when optimizing. However, I still think it's worth using to help eliminate jagged edges.
There are three alignment choices: left, center and right. Each of these choice aligns the bottom of the text to the location you clicked on the image. Like the other formats the alignment can be changed by selecting the text to be modified in the Text Entry dialog and clicking on the desired alignment. If you used multiple lines then each line can have a different alignment. To create multiple lines use the enter key on the keyboard while typing in the Text Entry dialog box.
The font style options are: bold, italic, underlined, and strikethrough. Each option can be applied individually or any combination of the four options can be applied together.
The Line Style options change the appearance of the outline (ie: solid, dashed, dotted, etc).
There are three types of joining: mitered, rounded and beveled. The miter join option creates pointed corners and intersections. The round join option creates curved corners and intersections. The bevel join option creates an angled or flattened effect at corners and intersections. The Miter limit is only available when miter join is selected. The size of the number determines how mitered (pointed) or beveled (angled/flattened) the corners and intersections will be. Lower numbers create a more beveled effect while higher numbers create a more mitered effect.
Kerning determines the horizontal space between individual characters. Positive numbers increase the distance between the characters while negative numbers bring the characters closer together. When Auto kern is selected the default kerning settings for the font are used.
Leading determines the vertical space between lines. This only effects text with multiple lines. When a hard carriage return (enter) or line break (shift + enter) is used in the Text Entry dialog box, the leading can be adjusted to change the vertical space between the lines. Positive numbers increase the distance and negative numbers decrease the distance between lines.
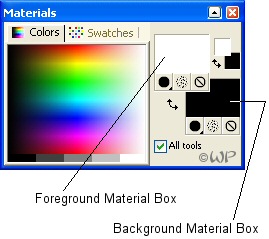
In addition to the modifications that can be made to the settings on the Tool Options Palette the fill and stroke (outline) can also be adjusted for the Text tool. The background material box on the Materials palette displays the fill of the text. The foreground material box on the Materials palette displays the material used to fill the stroke. In addition to solid colors, the fill or the stroke can also contain a gradient, pattern, or texture. Either the outline or the fill of the text can also be turned off.
If Vector text was chosen, once the text has been formatted and Apply has been clicked the text can be moved, rotated and resized just like a vector object. To do this use the handles on and around the text as indicated below.
The middle edge handles change the size either horizontally or vertically. The corner handles change the size in any direction. When hovering the pointer over the handle in the center the pointer shape changes to a cross hair with four arrows which indicates the option to move the text by dragging. Coming off of the center circle is a line which has a handle on the end used to rotate the text.
Although the size can be modified using the handles, I prefer to change the text by reopening the Text Entry dialog box. To do this expand the vector layer by clicking on the plus to the left of the layer name, then double click on the sub text layer. Select the text and increase or decrease size using the size setting on the Tool Option palette. This method more accurately maintains the proportions of the text. When the desired size is chosen click on Apply on the Text Entry dialog box to finish the adjustment.
Floating text can also be moved and resized using the move tool or the deform tool. A text selection can be moved as well. To find out more about moving floating text or a selection, view this tutorial.
There is such a wide variety of things that can be done with text that there is much room for creativity when using the Text tool. For some extra practice be sure to check out the tutorials using the Text tool, like the Pumpkin Blinkie and Glitter Text tutorials.